Hi again.
Remember how I mentioned all of the crazy projects (as in, multiple) we jumped into last weekend? Well, here is part two of that day and phase three in the nursery transformation: painting the armoire.
For obvious reasons (especially if you’ve seen the room in person), one of our chief concerns in this little makeover was to maximize storage. Every piece of furniture we brought in needed to be functional.
Back when we started talking about making a room for two, my in-laws graciously offered an armoire that they were no longer using.
They’d had it since around the time Jonathan was born (and moved it across continents), most recently, though, it functioned as a pantry in their kitchen. So it’s kind of a fun piece of history for the room.
It needed some work, though. Here was where we started:
The shelves were actually working (they just weren’t set up in this picture). But, it had a hinge that needed adjusting and some wood glue for one of the door’s joints.
Then, it was time to clean ‘er up! I found this great method for revitalizing wood furniture using a magic eraser and vinegar. It’s hard to capture on our camera, but you can see how much cleaner the door on the left is.
Next up was a trip to Home Depot. Our hope was to add some hanging space since Liam’s closet was just big enough for his stuff. We bought a $6 kit to install a little rod for baby clothes.
Here it is with the rod…simple enough.
All that was left to do now was find a nice day to take it outside for some sanding and painting. Queue the weather last weekend!
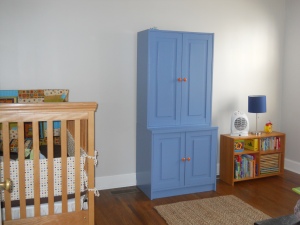
We chose to paint it a fun blue called Americana. We’ll have to skip to the final product because I forgot to take pictures of the paint in progress. 🙂
We’re having some problems with the left upper door sticking (which sanding hasn’t seemed to fix), so we have a little more work to do.
We picked out some cute little orange flower knobs at half price from Hobby Lobby. Aren’t they sweet?
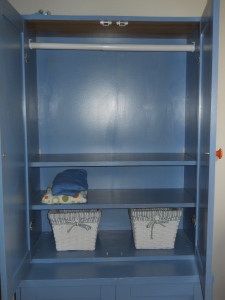
The plan is to put baby clothing on the top and have room for toy storage on the bottom. See? We’re making this armoire work hard for it’s space in the room!
My biggest frustration is some of the scratch marks that chipped the paint of the interior when we placed the shelves back in. I have a feeling that the inside is not going to stay very pretty with the wear, but we decided that it was worth painting the inside for continuity’s sake.
More projects are still to come!


Looks great Sami!
Thank you, Nana!
Looks great Sami! I’m sure you know this, but don’t forget to anchor it to the wall so your little guy doesn’t try to climb it and turn it over:).
Thanks, Lara! I forgot to mention that we anchored the two pieces together for that reason. But our baseboard makes it sit out a little from the wall–how would you recommend anchoring it? We don’t want any potentially life-threatening accidents!
Looks awesome… I think Dad has a “planer” to us on wood for slightly shaving off wood and this could help to stop the door from catching.
I love the new color and knobs! great way to add storage!!